Espresso is yet another tool (or API to be more precise) for Android, which is pretty small, concise and easy to learn. Espresso was introduced on
GTAC 2013 conference and the goal is to let developers write concise code for testing UI of application.
Even though the
target audience for Espresso is
developers (as mentioned by google) ,I don’t think its completely void for testers, since espresso leverage some of the potential key features which Robotium and Selendroid lacks
Key features
-
Espresso test runs optimally fast (“Leave your waits, syncs, sleeps, and polls behind”)
-
Easy to write code and much readable. (Not required to write boiler plate codes)
-
Easily extendable.
-
Removes the need to think about the complexity of Multi-threading testing
-
More importantly it’s Google-backed!!!
Currently Espresso is used by over
30 applications within Google like Google Drive, Google Map, Google+, Gmail etc.
Espresso is available as a standalone library which you can download from
here or it’s available as separate library with all dependencies collection which you can find from
here
Espresso Setup
Espresso setup is very easy as like Robotium. All we have to do is download the standalone library from the link provided above and reference it in our Android Test project (For more information on referencing of JAR file please check the my previous article did for Robotium from
here)
Once you have referred the JAR file, start writing the code in JUnit Test Case file as shown below
public class EspressoCalcTest extends
		ActivityInstrumentationTestCase2 {

	public EspressoCalcTest() throws ClassNotFoundException {
		super(MainActivity.class);
	}

	@Override
	public void setUp() throws Exception {
		super.setUp();
		// Espresso will not launch our activity for us, we must launch it via
		// getActivity().
		getActivity();
	}

	public void testFinal() {
		// Clear and enter text
		onView(withId(R.id.edtno1)).perform(clearText()).perform(
				typeText("100"));

		onView(withId(R.id.edtno2)).perform(typeText("1"));

		// Verify result
		onView(withId(R.id.txtResult)).check(
				ViewAssertions.matches(ViewMatchers.withText("101")));

		onView(withId(R.id.rdSub)).perform(click());

	}
}
This code is written for one my calculator application which we used while automating using Robotium, you can download the application from
here
As you could see the above code, we have wrapped the whole code much simpler, here is the comparison between Robotium and Espresso for same line of code
Entering text into Textbox one by first clearing the text and entering the number
Robotium
        EditText txtVal1 = (EditText) solo.getView(R.id.edtno1);
        solo.clearEditText(txtVal1);
        solo.enterText(txtVal1, "12");
Espresso
onView(withId(R.id.edtno1)).perform(clearText()).perform(typeText("12"));
As you could see the number of LOC in both Robotium and Espresso, Espresso code has reduced tremendously.
Performance
Lastly performance, Espresso as I mentioned earlier in the post, its super-fast compared to Robotium (And any tools available for that matter)
Here is the comparison of both in terms of time taken to execute same test
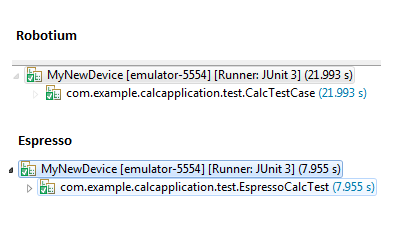
Robotium takes
22 Seconds, whereas Espresso takes only
8 Seconds, which is super-fast !!!
I hope you enjoy reading this post, please leave your comments and let me know if you like anything I missed in this post.
Thanks,
Karthik KK
karthik@executeautomation.com


Hi Karthik
Its really nice tutorial, i followed yours and succeed with basic setup.
could you help me how to get the value of toast value.
Ex : for login screen test case giving wrong input and get toast message
Have you tried integrating with CI tools like jenkins ?
Does espresso supports parallel testing ?