Creating you first Calculator application in android
Developing application for Android is as simple as developing a web application in ASP.Net, the eclipse editor provides us great Intelli-sense and WYISWYG development environment to create application UI very easily by doing simple drag and drop of controls.
Let’s not focus more on the great things editor has, we will jump in coding part to get things done.
To create calculator application for android, first we need to set up the environment ready, this was already discussed in topic “Setting up stage ready for Android Application development“, if you have not already read this topic, I highly advice you to do so.
Step 1
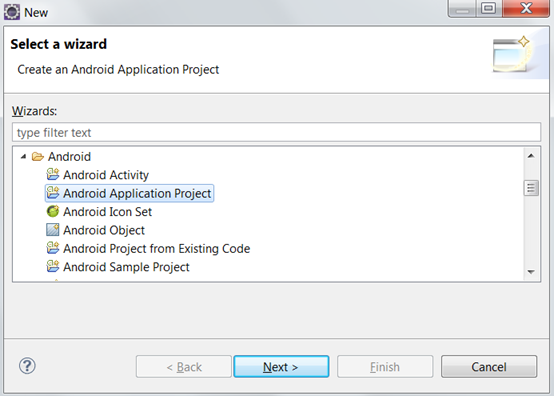
Once your environment is ready, open the Eclipse editor and select File –> New –> Others..Select project
You will see a dialog as shown, select Android and Android Application development Project as shown
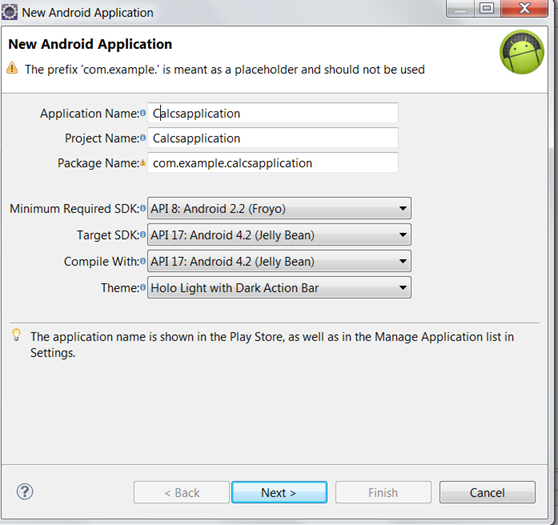
Give the name of your application as Calcapplication as shown
Just keep on selecting “Next” button and click “Finish“.
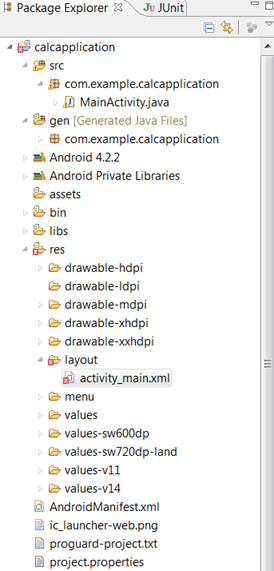
Now your Package Explorer will look something like this
We will talk about the most commonly used folders for developing our calculator in a bit
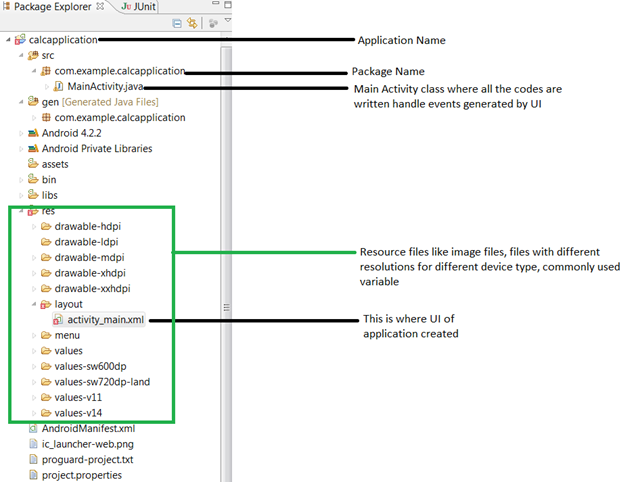
Here is there detailed explanation
We are not going to discuss on how to create UI of application, rather I am directly going to jump into coding part on how the code looks like
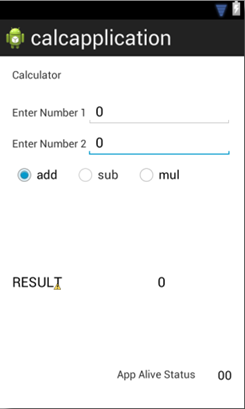
Here is how the application looks like in Graphical layout
Click on the activity_main.xml, the code looks like this
I have used RelativeLayout for my application, so that the controls can be easily aligned.
Now as you could see in the code above, all the text following @string is coming from strings.xml file as shown below.
Again, strings.xml is found under res folder.
If you open the string.xml file, the code looks like this.
calcapplicationSettingsCalculatorEnter Number 1Enter Number 2000rdGroupaddsubmulApp Alive Status0:0
Now you will understand where all the text of application has come from.
Now Open the MainActivity.java file and write the code which perform operations
package com.example.calcapplication;

import android.os.Bundle;
import android.os.SystemClock;
import android.app.Activity;
import android.text.Editable;
import android.text.TextWatcher;
import android.util.Log;
import android.view.Menu;
import android.view.View;
import android.widget.Chronometer;
import android.widget.EditText;
import android.widget.RadioButton;
import android.widget.RadioGroup;
import android.widget.RadioGroup.OnCheckedChangeListener;
import android.widget.TextView;

public class MainActivity extends Activity {

	EditText txtNo1;
	EditText txtNo2;
	RadioGroup grpOperation;
	RadioButton rdAdd;
	RadioButton rdSub;
	RadioButton rdMul;
	Chronometer chrono;

	private String radioBtnValue = "add";

	private String result;

	TextView txtResult;

	@Override
	protected void onCreate(Bundle savedInstanceState) {
		super.onCreate(savedInstanceState);
		setContentView(R.layout.activity_main);

		chrono = (Chronometer) findViewById(R.id.chrono);

		//Start Chronometer
		startchronometer();

		txtNo2 = (EditText) findViewById(R.id.edtno2);
		txtNo1 = (EditText) findViewById(R.id.edtno1);
		txtResult = (TextView) findViewById(R.id.txtResult);

		txtNo2.addTextChangedListener(addthevaluesListerner);

		grpOperation = (RadioGroup) findViewById(R.id.rdgrpOps);
		rdAdd = (RadioButton) findViewById(R.id.rdAdd);
		rdSub = (RadioButton) findViewById(R.id.rdSub);
		rdMul = (RadioButton) findViewById(R.id.rdMul);

		addRadioChange();

	}

	private void startchronometer()
	{

		int millisecond=0;
		String chronotext = chrono.getText().toString();

		String array[] = chronotext.split(":");

		if(array.length == 2)
			millisecond = Integer.parseInt(array[0]) * 60 * 1000 +
					Integer.parseInt(array[1]) *1000;

		chrono.setBase(SystemClock.elapsedRealtime() - millisecond);

		chrono.start();
	}

	private void addRadioChange()
	{
		grpOperation.setOnCheckedChangeListener(new OnCheckedChangeListener() {

			@Override
			public void onCheckedChanged(RadioGroup group, int checkedId) {
				// TODO Auto-generated method stub
				int id = grpOperation.getCheckedRadioButtonId();
				View rdView = grpOperation.findViewById(id);
				int radbuttonID = grpOperation.indexOfChild((rdView));
				RadioButton btn = (RadioButton) grpOperation.getChildAt(radbuttonID);
				radioBtnValue = (String)btn.getText();
				//Call the Update Text
				updatetext();

			}
		});
	}

	private TextWatcher addthevaluesListerner = new TextWatcher(){

		@Override
		public void afterTextChanged(Editable s) {
			// TODO Auto-generated method stub

		}
		@Override
		public void beforeTextChanged(CharSequence s, int start, int count,
				int after) {
			// TODO Auto-generated method stub

		}

		@Override
		public void onTextChanged(CharSequence s, int start, int before,
				int count) {
			try
			{
				result =s.toString();
			}
			catch (Exception e)
			{
			}
			updatetext();
		}

	};

	public void updatetext()
	{
		if(radioBtnValue.equalsIgnoreCase("add"))
			txtResult.setText(Integer.toString(Integer.parseInt(result) + Integer.parseInt(txtNo1.getText().toString())));
		else if (radioBtnValue.equalsIgnoreCase("sub"))
			txtResult.setText(Integer.toString(Integer.parseInt(result) - Integer.parseInt(txtNo1.getText().toString())));
		else if (radioBtnValue.equalsIgnoreCase("mul"))
			txtResult.setText(Integer.toString(Integer.parseInt(result) * Integer.parseInt(txtNo1.getText().toString())));
	}

	@Override
	public boolean onCreateOptionsMenu(Menu menu) {
		// Inflate the menu; this adds items to the action bar if it is present.
		getMenuInflater().inflate(R.menu.main, menu);
		return true;
	}
}
The code is very plain and simple as is it meant to be, since it’s just doing simple Add/Sub and multiple operation.
I have used TextWatcher interface,which will perform the Changing of value in result if value of second text changes.
That’s it, you have created your first android application.
Please find the complete source code of the application here.
Please feel free to leave your comments and ideas, which will be greatly helpful.
Thanks,
Karthik KK
Post Author:
Karthik kk
9 Replies to “Creating you first Calculator application in android”
how to solve this issue in amd processors
emulator: ERROR: x86 emulation currently requires hardware acceleration!
Please ensure Intel HAXM is properly installed and usable.
CPU acceleration status: HAX kernel module is not installed!
1) are you still actively supporting these tutorials? I ask because the above questions were posted between May and Sept 2016 and your last response was in 2015


 Give the name of your application as Calcapplication as shown
 Just keep on selecting “Next” button and click “Finish“.
Now your Package Explorer will look something like this
Just keep on selecting “Next” button and click “Finish“.
Now your Package Explorer will look something like this
 We will talk about the most commonly used folders for developing our calculator in a bit
Here is there detailed explanation
We will talk about the most commonly used folders for developing our calculator in a bit
Here is there detailed explanation
 We are not going to discuss on how to create UI of application, rather I am directly going to jump into coding part on how the code looks like
Here is how the application looks like in Graphical layout
We are not going to discuss on how to create UI of application, rather I am directly going to jump into coding part on how the code looks like
Here is how the application looks like in Graphical layout
 Click on the activity_main.xml, the code looks like this
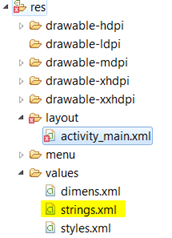 Again, strings.xml is found under res folder.
If you open the string.xml file, the code looks like this.
Again, strings.xml is found under res folder.
If you open the string.xml file, the code looks like this.

how to solve this issue in amd processors
emulator: ERROR: x86 emulation currently requires hardware acceleration!
Please ensure Intel HAXM is properly installed and usable.
CPU acceleration status: HAX kernel module is not installed!
You need to install “Intel x86 Emulator Acceleration (HAXM installer)” from Android SDK Manager.
Thanks,
Karthik KK
getting error “cannot resolve symbol R”?
getting error “cannot resolve symbol R”?
How to resolve symbol R error
GO to the file R.Java and add the variables that cant be detected by the android studio.
Hi dude, i have also find out one good example
Radio Button Basics Android
class R doesn’t have a method “menu”.
R.menu – doesn’t work
kk,
1) are you still actively supporting these tutorials? I ask because the above questions were posted between May and Sept 2016 and your last response was in 2015
2) I am trying your appium tutorial and I came here for the android calculator code.
http://executeautomation.com/downloads/CalcapplicationTest.zip – is now a dead link
thanks,
Tim